Have you ever had a piece of black and white line art, but you needed it to be black lines on a transparent background instead? If your artwork is clean, there's a very easy way to accomplish it (and no, it's not just using the Multiply blending mode, which won't work if, say, you need it to make a Brush.)
Open the art on its own layer. If necessary, hold down Option/alt and double click on the Layer Thumbnail, so it won't be the locked Background layer. (The Option/alt key prevents the Layer Options dialog from opening when making a Background Layer into a Normal Layer.)
Select all (Command/ctrl+A) and Copy (Command/ctrl+C).
Create a new Layer Mask on that layer. (Click the New Mask icon at the bottom of the Layers palette.)
Create a new Layer Mask on that layer. (Click the New Mask icon at the bottom of the Layers palette.)
Hold down Option/alt, and click on the Mask Thumbnail in the layer palette (the one on the right.) This will allow you to see the mask full size on your screen. It will look white, since there's nothing there yet. NOTE: This step is absolutely essential. If you skip it, the next step will paste the image onto a New Layer. If that happens, delete the layer, and repeat this step .
Paste. (Command/ctrl+V) It should now show your line art, exactly as if you were looking at the normal layer, not the Mask. The Layer Palette, though, will show both images, side by side in the two thumbnails, with the "active" marks around the Mask thumbnail.
Invert, (Command/ctrl+I or Image > Adjustments > Invert) so that you have white line art on a black ground.
Click the Layer Thumbnail image, to return to normal viewing. The background will look transparent. (I'm using a custom color transparency. Your checkerboard will probably look different, but it means the same thing. Transparency!)
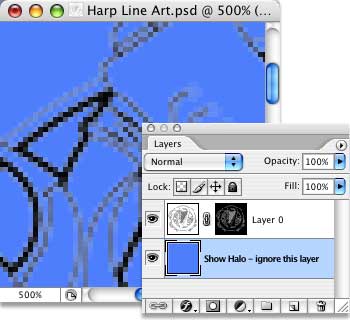
If you were to use the image now, though, you'd have gray edges on the art where the original black was anti-aliased on the white background, which would tend to give it the dreaded "White Halo."
I've added a blue fill below the art in this image, and set the Zoom to 500% so you can see what I'm talking about. (You can skip all of this, unless you want to see the halo on your own art.)
I've added a blue fill below the art in this image, and set the Zoom to 500% so you can see what I'm talking about. (You can skip all of this, unless you want to see the halo on your own art.)
So, Fill the image with Black. (Or whatever color you want to use.) (Command/ctrl+Delete to fill with the Foreground color.) The mask is now the line art, and the anti-aliased (semi-transparent) pixels will be filled with the color you've chosen, not a mixture of the original color and white. As you can see, the Halo is gone.
Finally, Apply the Mask. (Right click the Mask Thumbnail, or control+click on a Mac with a one-button mouse, and choose Apply from the drop down menu.)
And that's it! The artwork is now perfectly translated from black lines on a white ground to whatever color you choose, on a transparent layer!


